The transparency on the SNES, while documented properly, made me have some headaches understanding how it works. Now that I've figured the truth (or at least I'm pretty damn close to), I'm writing a small document to spare someone else the headaches I've had if if could be useful to someone wanting to do a homebrew program for the SNES or to just understand how their favorite games works internally.
Important Note: I can't guarantee the technical accuracy of anything mentioned in this document. I tried to make it as accurate as I could, but if you want something more accurate check anomie's documents. This document is for explaining transparency both on the technical side and the practical side.
First of all, the SNES does not support any kind of "real" transparency. It just have a way to simulate it, but this way is limited. On the other hand, the SNES can do cool effect real transparency cannot, like image inversion.
Supported Transparency Effects
The SNES supports 4 kind of transparent-like effects.
Color Addition
Useful for drawing transparent rays of light or to just lighten some layers.
Example: Chrono Trigger uses it in Chrono's room when you open the curtain.

Color Averaging (Addition then Halving)
This is the most widely used transparency effect. It can average colors of 2 images, making one look like translucent. This allow to draw translucent water, translucent fog/clouds, translucent shadows, ghost sprites, etc...
Example : The water in Secret of Mana.
Color Subtraction
Useful for transparent shadows, simulating night or stormy weather, etc...
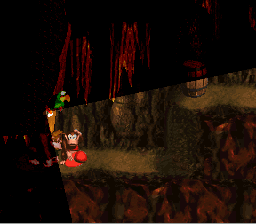
Example : "Torchlight Trouble" level in Donkey Kong Country.
Color Subtraction then Halving
This one is not really useful, and does not make any sense in terms of transparency. I've never found any game that uses this yet. It could be useful if you wanted a layer to somehow be very dark but still being "slightly transparent".
Hardware Limitation of Transparency Effects
In addition to this there is a primordial limitation : The color addition/subtraction always happen between 2 pixels of given BG plane/sprites. At most two different layers are implied in transparency. For example, if you're trying to make a transparent ghost sprite stand on a brick background, and have a transparent fog covering all that, while both effects are possible separately, the SNES hardware can just not do that, and it will never show up like you'd expect. Either the background, the fog or the ghost will be "clipped" depending how you set it up. Once you understood that, it makes things simpler. So there can be as many transparent objects/layers as you'd like on the screen, but they can never overlap without clipping something.
A second limitation is that a sprite can never be transparent through another sprite, because all sprites are merged into a single layer in the viewpoint of the SNES PPU. Sorry, but the SNES hardware can't do that either. You'd have to use a background layer if you're trying to do such an effect.
Main Screen and Sub-Screen
Now we will talk about the main screen and the sub screen. You probably already know that the SNES have 4 background layers, one sprite layer. The SNES can enable each of those 5 layers separately and make two planes with the combination of them. Those two planes are called the main screen and the sub screen. (note that there is 2 numeration of BGs around, they can be numbered 1-4 (ZSNES) or 0-3 (Snes9x). I'll be using 0-3, and just do +1 if you want)
To determine which pixel is made of the a specific screen, the SNES do an algorithm close to the following, and it always does it twice per pixel (it may not be accurate, but it should be pretty close to the truth):
Only if sprites are enabled and not disabled by window clipping:
- Of all sprites grab the first 32 on the current scanline (after having converted everything in up to 34 8x8 sprites, dropping the rest)
- Determine the first sprite among those 32 which takes places the current pixel.
- Take the priority number of that sprite (0 to 3). Note that following sprites are ignored even if higher priority.
Fetch the corresponding pixel for all enabled BGs. We pass if the pixel is transparent (color #0) or if the BGs is disabled, or if the BG does not exist in the graphic mode (0-7) that is used, or if it is disabled by window clipping.
Now the SNES PPU somehow decides which BG or sprite pixel wins, according to an order that is rather complex and that depends on the graphic mode (0-7) used. This order is widely documented already and I don't want to enter into details here (check anomie's doc if you want to go more into details).
What is embarrassing is what to do if all enabled&non-clipped layers result in transparent pixels. For the main screen, the background color (palette's entry #0) is used. For the sub screen the constant color set by the register $2132 is used.
Now, it's rather complicated, but you should be able to build what your main screen and your sub screen is. (considering the SNES does that 2x256x240 pixels 60 times per second it's no surprise emulators are so slow as opposed to other system's emulators).
Apply Color Effects
By default (if no transparency is used), the main screen is what is shown on the screen. Transparency can be enabled individually for all layers (although only those present in the main screen can have any effect) and for the color-0 background. When transparency is enabled eight effects are available :
-
Do one of the four math effects mentioned above (add, average, subtract, subtract then half) with the constant color stored in register $2132. This is useful if you want to simulate night or fog without wasting a BG layer for this sole purpose. Also with window clipping, you can draw nice shapes in transparent colors (like the numbers in Super Mario Kart).
-
Do one of the four math effects mentioned above with the corresponding sub-screen pixel, and if it was transparent do as in 1). This is useful if you want any layer to actually be transparent.
Remember that the effect can be enabled separately for all layers of the main screen, with the exception of sprites. For sprites, the effect is either always disabled, or if enabled only sprites using palettes 4, to 7 have the effect applied to them. Sprites with palettes 0-3 are still part of the main screen, but you can't apply a transparent effect to them. One way around this is to make palettes 4-7 mirrors of 0-3 so that you can select individually on each sprites, but in most cases there is a work around this annoying limitation (see below for more details).
The exact operation is the following:
-
Color adding : R, G and B are added separately, if the result is greater than 31 it is forced to be 31 (so it can't "overflow" or anything). In this mode the "neutral" color is black, any layer added with black won't be affected. It is possible that a layer adds up with itself so that it becomes twice as bright. Since addition is commutative, having layer A in main screen added with layer B in sub screen has the same effect than making it the other way around (exception seen below).
-
Color adding + halving (averaging) : R, G and B are added separately, and the 6-bit result is shifted right. There is no neural color, but it is possible for a layer to be averaged with itself so that it appears it is not affected by transparency when technically it is transparent. Again since the addition is commutative, you can get the same effect by 2 different ways.
-
Color subtracting : The sub-screen is subtracted from the main screen. If the result is smaller than 0, it is forced to 0. The neutral color is black (any color subtracted by black isn't modified). It is possible for a layer to be subtracted from itself so that it becomes pitch black.
-
Color subtracting + halving : Pretty much the same as above, but the result is shifted to the right (after ?) clipping to 0. Almost always results in ridiculously dark colors.
Important Note: If either screen pixel is transparent (all layers that are enabled and that exists are transparent or are clipped), the result of the addition/subtraction is not halved, even if you told it to do so.
-
If the main screen is transparent, color #0 is added/subtracted with sub-screen pixel if enabled, never halved. If disabled, color #0 is shown as-is.
-
If the sub-screen is transparent, the color constant set in
$2132is either added or subtracted from the main screen, never halved. For that reason, it's often desirable to set both palette color #0 and$2132color to black unless you know what you are doing.
Concrete Examples
I hope the above paragraph didn't make you have too much headaches. Now let's move to actual concrete cases. Unless specified, the BG color (palette entry #0) and constant color $2132 are both set to black. Let's say you want sprites your screen to be transparent ghosts. You may come up with the following set-up:
Example 1
Main Screen: Sprites
Sub Screen: BG0
Transparency Enabled On: Sprites, Backdrop
The sprites are displayed and because transparency is enabled (with addition+half operation), it is averaged with the background layer, resulting in ghost sprites. When no sprite is here the background is shown normally, because added with color #0 which is black.
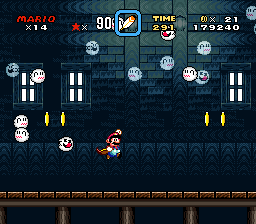
But transparency is enabled only for sprites using palette 4-7. Sprites using palette 0-3 does never have transparency used, so they will be solid. This is exactly what happens in Super Mario World in ghost's houses; some sprite items such as 1-up mushrooms becomes accidentally transparent because of their palette.
To fix that problem, remember that the addition is commutative. You can have a transparent BG in front of opaque sprites and the ghosts will look the same:
Example 2
Main Screen: BG0
Sub Screen: Sprites
Transparency Enabled On: BG0 (add+half sub-screen)
But this time, all sprites are placed on the sub-screen so all of them are ghosts, no matter their palette ! This is the only difference between both set-ups.
By the way if there is any transparent pixels in BG0 and there is a sprite at the same location, the sprite will look solid on that pixel (in example 1) or will not be visible (in example 2), which is not the desired effect where you'd want it to be averaged with black. So use a non zero black color instead in your BG0.
Now onto another example a little more complex : say you want a transparent background of fog above your game level. Remember that the addition is commutative, so in fact you can have your transparent level on a opaque layer of fog, the result will be exactly the same ! Let's admit your fog is in BG1, and your level is made of BG0 and sprites, and that there is a status bar on BG2 that you don't want to be transparent. You can come with the following set-up :
Example 3
Main Screen: BG0, sprites, BG2
Sub Screen: BG1
Transparency Enabled On: BG0, sprites (add+half sub-screen)
This will get the desired result, but only sprites using palette 4-7 will appear below the fog. Sprites using palettes 0-3 will appear above the fog (unless they are hidden behind BG0 or BG2). If that bothers you do the following:
Example 4
Main Screen: BG1, BG2
Sub Screen: BG0, sprites
Transparency Enabled On: BG1 (add+half sub-screen)
That way all your sprites are below the fog and you don't have to worry about that palette numbers. Oh no! That weapon icon sprite in my status bar is now behind the fog, and it's not supposed to ! What to do ?
Don't panic, in fact there is a easy way around that ! You can come with that set-up :
Example 5
Main Screen: BG1, BG2, Sprites
Sub Screen: BG0, Sprites
Transparency Enabled On: BG1 (add+half sub-screen)
(you also need to set the priority bit for all tiles in the map that contain your fog) You can determine which sprites is above the fog and below the fog no matter their palette ! Set your weapon icon in the status bar with priority 3 (above the BG1 so it's not affected by transparency), and the sprites in the level with priority 2 (hidden below hi-priority BG1, but shows up because of transparency is enabled on that BG1). Because sprites are both in a main screen and the sub screen, it makes this possible, and you get rid of the annoying palette number dependencies. Similar concept applies to BGs if you want a portion of them to be transparent and another portion to be opaque (using individual tile priority).
Okay now a third concrete case. You want your level to be shown at night, but don't want the status bar to be darkened. A simple way is to subtract grayish-yellow from the screen so that dark grayish-blue remains. So set a grayish yellow on $2132 (not too light else the screen will become too dark) and have the following set-up:
Example 6
Main Screen: BG0, BG1, BG2, Sprites
Sub Screen: -
Transparency Enabled On: BG0, BG1, sprites (subtract color constant)
This is fine but the problem is the same as in example 3, whenever the sprites are darkened depends on their palette. The solution to that is to set the sprites in the sub screen. You could do as in example 5 but it would waste one layer for solid yellow which is a waste. Let's admit you need both BG0 and BG1 for your level. Let's change the palette entry #0 to our grayish-yellow and try this set-up:
Example 7
Main Screen: BG2
Sub Screen: BG0, BG1, BG2, sprites
Transparency Enabled On: Backdrop (subtract sub-screen)
The level will appear with negative colors because it is subtracted from our yellow constant ! This is exactly what happens in Donkey Kong Country infamous level "Torchlight Trouble" (in "Gorilla Glacier"). They wanted to darken the screen, and that for all sprite numbers, not only 4-7. If you disable transparency in Snes9x by pressing '9' you see the level in negative! Thanks god you can easily negate the palette by XORing all it's entries with $FF (except the status bar palette of course) and you're done.
Oh no your famous weapon sprite icon in the status bar is darkened and you didn't want to ! That's where clipping windows could come in handy, by clipping your icon you could make it also a part of the main screen but not other sprites. Or since you're bothering with the palette anyway it could be clever to subtract all entries of it manually, so that you can have transparent ghosts in the night, whoo-hoo !
But now you should know enough to figure this kind of tricks by yourself. I hope this document was useful or at least informative to you, and that pseudo-transparency on the SNES in the form of additions and subtractions of main/sub screens won't ever give you any headaches any longer. All you need to know is what should be added/subtracted to/from what and play a little with layer priorities, that sprites should always be part of the sub-screen if you don't want their palette number to annoy you, and you should be fine now.
Written by Bregalad (April 18th, 2009)